Sunday, May 31, 2015

WIP - Wrath of Kings, Teknes Union Workers


Continuing on...

I airbrushed the basecoat. 


For the brown, I think I used Vallejo Model Air Tank Brown, or Vallejo Mud Brown, or a combination of both.  I know I used Reaper Burgundy Wine for the shadow. 

For the skin, I used Vallejo Model Air Skin Tone, but it really paled to a yellow tone, over top the white primer.  I didn't bother with a second coat, since I knew I would be applying paint with a brush at some point.

The spray pattern for my airbrush is pretty bad.  I learned later that I had already bent my needle-tip.  Grrrr..


Since I had nothing to lose, I removed the burr with a cosmetic emery board.  That improved the pattern, but I'll probably buy a needle kit to replace it.  I can also see if I can use the needle from the side-feeder, but I haven't gotten around to digging it out yet.

I don't like the direction that the color is going for the Union Workers.  After much thought, I decide I'm going to go for a black leather.  That will give a high-contrast backdrop for the shoulder-pads, swords, and heads.  For color, I'll paint striped leggings.  The crew will look like a rugby team!


I attempt to achieve a weathered leather look, by sponging liquid mask on the brown undercoat, before airbrushing on the black.  I used Microscale Micro Mask.  The experiment totally failed.  After airbrushing on the black, I couldn't figure out a way to remove the mask.  I couldn't even feel it.  It was like it had totally dissolved.  I tried using poster putty and masking tape to pull it off, to no avail.

Along the way, my Carnevale Kickstarter arrived from Vesper-On!  And a gremlin from their new, forthcoming game, Home Invaders, invaded my stash!  How cool is that!


I masked the swords with masking tape, and after airbrushing on Boltgun Metal, I airbrushed a filter made of my homebrew blue wash, a little burnt umber, and little Vallejo Thinner Medium.  The underside of the shoulder-pads got it, too.  I also experimented with airbrushing various tones on the underside of the skin.


Here, I added dark-lining, and I sponged on a highlight of Chainmail, followed by a brush wash of my homebrew blue wash.


Monday, May 25, 2015

Miniatures games inventory

Well, just for fun, this question came up last Thursday during my weekly Hobby Hangout on Google Hangouts.  How many miniatures games do I have for which I could field one or more viable factions?

Here's the list, in roughly descending order, according to volume of miniatures.


·      Warhammer Fantasy:  Lizardmen, Dark Elves, Orcs & Goblins, Bretonnians, Empire, Skaven, Wood Elves, Vampire Counts, High Elves, Beastmen, Ogres, various
·      Confrontation:  almost all factions
·      Warhammer 40K:  Tau, Eldar, Orks, Adeptus Mechanicus, various
·      Various miniatures for RPGs
·      Dust
·      Malifaux
·      Wrath of Kings
·      Lord of the Rings / War of the Ring
·      Hordes (and a little Warmachine)
·      Dystopian Wars
·      Alkemy
·      Darklands
·      Freebooter’s Fate
·      Dark Age
·      World of Twilight
·      Carnevale
·      Deep Wars
·      Eden
·      Deadzone
·      Bushido
·      Historical – 15th – 17th Century
·      Historical – Mongols
·      Historical – Crusaders
·      Historical – Other: Dacians, Celts, Gauls, Greeks
·      Saga
·      Nemesis
·      This Quar's War
·      Wreck Age
·      Incursion
·      With Hostile Intent
·      Wargods of Aegyptus
·      Godslayer
·      Sphere Wars
·      Dystopian Legions
·      Uncharted Seas
·      Blood Bowl
·      Dwarf Wars
·      Void 1.1
·      Infinity
·      Dropzone Commander
·      Guild Ball
·      Brushfire
·      Arena Rex
·      7th Voyage
·      Shieldwall
·      Fantacide
·      Celtos
·      Crucible
·      Firestorm Armada
·      Arena Deathmatch

And I still plan to play about 75% of them...

And paint all of them.....

Saturday, May 23, 2015

Wrath of Kings and prep for CMON Expo

I decided I'm going to the CMON Expo.  This is year three for CMON Expo, if I'm not mistaken, and it will be the first time I attend.  I figure it's worth driving 3-and-a-half hours for what it has to offer -- gaming and painting!

The only problem is that it's only a month away, and I want to bring a fully painted, high tabletop-standard, starter set warband to play in the Wrath of Kings narrative campaign.  Why's that a problem?  The models are still in their starter box, untouched.  I need to paint 30 models in one month....

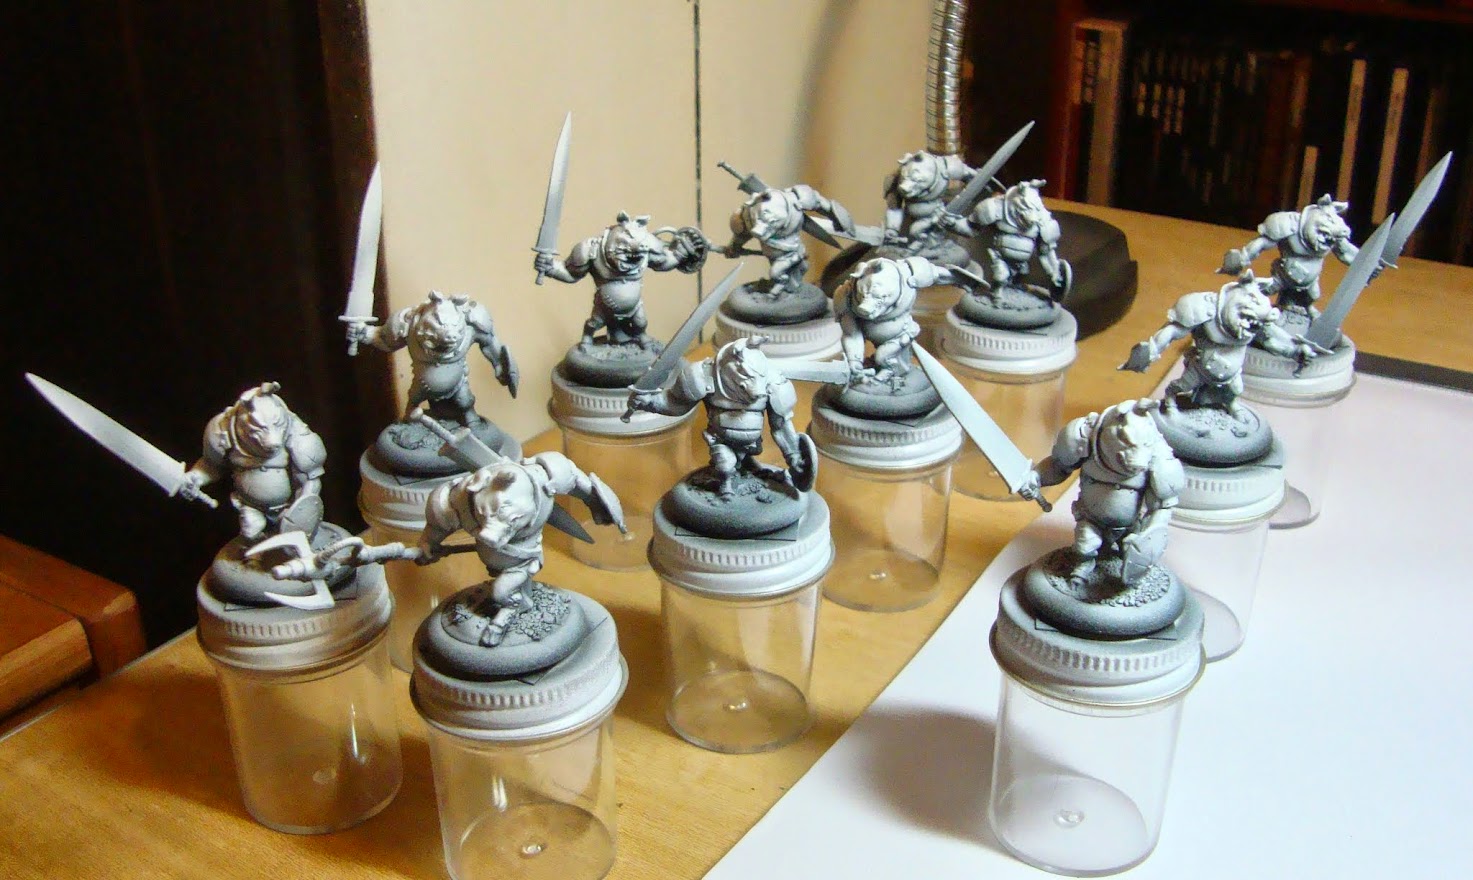
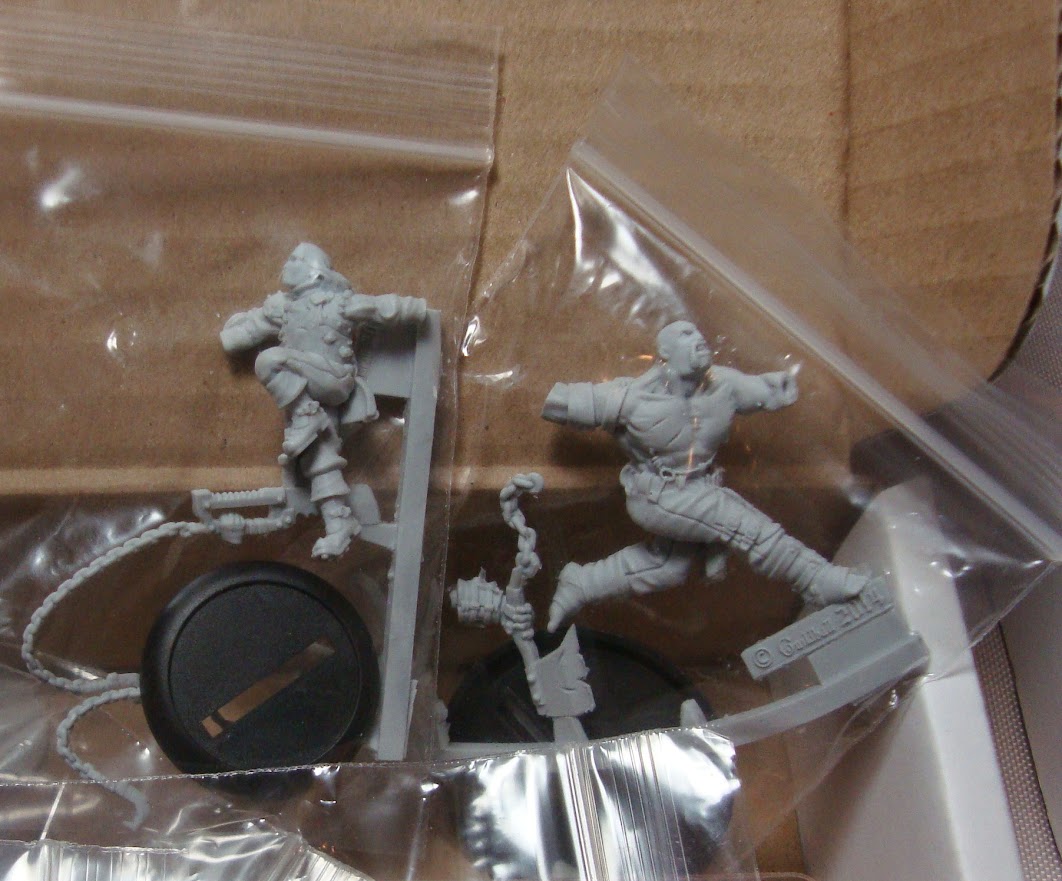
I spent the last week prepping the first unit for the Teknes faction, the unit that first attracted me to the game, when the models were first introduced in resin, long before the game was released -- the Union Worker pigmen!


Here you see them propped up against paint-bottles, while they dry in their stand.  More on that in a minute.


The plastic is PVC plastic, as opposed to the polystyrene plastic used for scale model kits.  PVC plastic is a little more difficult to work with than polystyrene, but it's not horrible.  You can use model cement, but it doesn't work as well as it does on polystyrene.  It's a little frustrating, as the material is so close to behaving optimally, but it's just shy.  These models were a little better-behaved than the Deadzone models, though.

For removing mold lines, I used an X-Acto blade and emery boards.  The results for removing mold lines were good enough overall.  There were some instances where I just couldn't scratch out a fine line -- for instance, along the spittle trail.  That's a little grating, especially since the spittle trail is one of the coolest features for that particular sculpt, but the quality of the models overall makes up for it.

In addition to the smoothness of the plastic, one of the big benefits of the PVC is that all of the weapons were straight, without requiring a hot-water bath to straighten them out.  Plus, the material holds excellent detail.  And, as opposed to the fragile designs of Wyrd miniatures, these models are going to be robust game-pieces on the tabletop.

The design for the cuts is superb, and the mortise-and-tenon joints are shape-coded so that there are no mistakes.  On the other hand, I think there was a mis-pack for one of the arms, and I had to cut it down, improvise the join, and fill the gaps with putty.

One odd feature for these designs, though, is the "deep-well" bases.  I read that they're extra-deep, because they were intended for inserts that were available on the Kickstarter.  I don't recall that add-on, and I apparently didn't buy them.  Nor are they available otherwise, as far as I know.  So that means most people are confronted with figuring out how to attach the models to the bases, without them looking like they're standing in a crater!

On top of that, the Union Workers have tiny little feet.  So contact point is miniscule.  They do have plastic pins, which helps a little, but there's not enough material to actually pin the model with paper clips.  Nor would I want to for 30 models!  It would have been nice to have had slottas and slotta-bases.

So my solution was to try out spackling compound.


This stuff had a nice pasty consistency that was easy to stir into the base.  Faster and easier than Milliput.  However, the spackle is not thick enough to hold the model upright, when you stick it in.  Thus the dropper-bottle props.

The spackle is not adhesive enough to finish there, though.  When it cured, the model pretty much just popped out.


 So that required a follow-up session with 2-part, 5-minute epoxy.

The spackle is still soft, when it cures.  Here you can see how easy it is to gouge out chunks of it with a wooden toothpick.


I'm thinking the Milliput might have been a better option after all, especially since you can texture the Milliput.

If I still want to use paste, Liquitex modeling paste would probably cure harder than the spackle.


I'll try some of these other options on the remaining models. 18 to go!


In other news, I acquired an overhead webcam to use with my Google Hangouts.  This is the Ipevo VZ-1 HD.


It's pretty cool, because it does show a sharp image, where you can finally see the colors of the models, without them being washed out by the light.  I still need to figure out how to set the focus, though.  The auto-focus is actually too responsive, and it's constantly going in and out of focus, as I work on the model, even when I keep it in roughly the same position.

Another acquisition I'm excited about is the arrival of my Guildball Kickstarter.  Yay!  Finally!

These models are absolutely beautiful.  It pays to jump in early in the production run, while the molds are still fresh!

The Fishermen's Guild
The Butcher's Guild
 I had a hard time resisting working on these models, ahead of Wrath of Kings!  If I didn't have CMON Expo to force my hand, I don't know which project I would have started with.

Here are the Union Workers with their coats of primer, using the zenithal technique.


For the next step, I finally pulled out my Grex airbrushes.


I won these airbrushes, when I won Best of Show at the very first Capital Palette competition in 2012 (before I volunteered to organize the event).  I've been waiting to improve my airbrushing skill before using them.  I may have waited too long, though.  I now have no desire to use the airbrush on the right, since it's a side-feeder.  The huge reservoirs and higher air pressure are intended for larger projects.  Maybe I'll use it for terrain.

Both brushes have screw-on attach-points for the hose.  They also have adapters for friction-fits.  Unfortunately, I'm now spoiled, since I've been using a quick-release adapter (shown on the left in the picture below).  I'll need to purchase an adapter for this brush to use the quick-release.


Sunday, May 10, 2015

Iron Painter a bust

It appears I missed the deadline.  I thought it was midnight EST tonight, which is what I thought it was for Round 1.  It appears the deadline for Round 2 is 6pm EST.  I started my upload at about 10:30 EST.  So that's two-and-a-half weeks of leisure time down the drain.

Well, hey, at least it's blog fodder.  Here's the WIP series.

I changed from a classic blue theme for a Warhammer High Elf to a red theme.  I've always hated the blue theme.  Painting it didn't improve my opinion of it.

Blocking out the freehand design.
Filling it in.  I'm now wishing that I had refined the lines and colors on paper first.  I'm not really liking it.
But there's not going to be enough time to back away, so I salvage what I can, with what I have to work with.


Needs some stars. 

While I'm not pleased with how the piece is coming together as a whole, I am enjoying the process.  I'm attempting a lot of things for the first time:  freehand banners, white armor, fast color change-outs on the airbrush, pronounced lining and edging, and more.  It's also been good practice for adding "opacity" to my technique toolbox.


I'm pleased with the gem stones.  They took a lot more work than I expected, but I'm building that muscle memory.

Meanwhile, we haven't forgotten the other side of the equation.
I still need to learn how to place the shading on gold lettering.  I couldn't find any of my references!

I'm finally adding pigments to the mix for terrain.

Added flock.  I like how the base turned out.


And the final result.  It's a poor color composition, because of the banner on the left.  Maybe I'll rework it before I show it at a show.


Here's the narrative for the scene, to accompany the theme for Iron Painter, Round 2, "The End of the World As We Know It":


The Warhammer community agonizes over the prospects for 9th Edition.
Entire armies eliminated from the game.  Perhaps not even an army game anymore.
The Warhammer setting obliterated.  High Elves and Dark Elves united.
For Warhammer, is this the end of the world as we know it?

Monday, May 4, 2015

Iron Painter Round 2 - WIP 3

So this is what happens when you attempt to soften plastic with naked flame...


Yes, the thing actually caught fire.  Lesson learned.

So I totally reconstructed the standard.

Meanwhile, I was building out the base.


And here's a preview of the story for the piece...