Monday, December 14, 2015

First game of Guild Ball

My buddy, Chris, and I played our first game of Guild Ball this past weekend.  We are both happily impressed with the game!

An action-packed pitch.  Fishermen versus Masons.

We played the introductory version of the game, played on a 2'x2' pitch with 3 characters per side.  I played Fishermen's Guild, and Chris played the Mason's Guild.  The estimated play-duration for the introductory format is 30 minutes.  The first team to score 6 Victory Points wins the game.  Our game consumed an entire afternoon.  Even accounting for lots of rules lookups, we scoffed at the idea of the game requiring only 30 minutes.  Until we found the rule the next day that said each Goal was worth 4 Victory Points, and each Takedown was worth 2 Victory Points.  The way we had played, each Goal was worth 1 Victory Point, and each Takedown was just a punchy, satisfying means to an end!

"Hey, you!  Come pick on someone your own size!"
Despite our oversight, the rules are very well written.  They pretty much answered every question we had, minus a few ambiguities, which turned out to match our interpretation, once we found clarifications in the FAQs and Errata.

We both liked the pace of the game.  It flows very naturally, and the mechanics promise to fade to the background, directing our focus and attention on deciding on best field position and setting up synergistic plays.  The card profiles strike just the right balance, offering depth and personality without overburdening the character with a tome of special abilities (I'm looking at you, Malifaux!).  I can actually learn my characters within the first few goals and learn the key attributes of the opponent characters.

OK, I love the dynamic poses, but is this Guild Ball or a dance party?

We're looking forward to our next game!

Tuesday, December 1, 2015

Green squad takes the field

I've been off the grid for a month, for which I totally blame work.  But, hey, I have to pay for this hobby somehow!

Finally, I have color on my second unit of Tau Warriors.  One less squad that I need to proxy using AT-43 models.  That said, the AT-43models serve wonderfully as proxies.  Don't have to worry about storage and transport -- just throw them loose in a container and bust on out the door.  And they look just fine on the table.

But there's definitely something very satisfying about having the actual Tau models strutting on the tabletop.  After all, it was the original and believable look of those models that struck a chord with me enough to convince me to dig into Warhammer 40K.  Well, them and Kroot.  How pleasantly convenient it was to discover that they actually fought together in the same army...  Space Marines?  Meh.  Crisis Suits?  Bleah.  Fire Warriors and Kroot.  Those are the sci-fi toy soldiers that make me happy.


Anyway, I tried a few new things with this squad, and I'm only partially satisfied with the outcome.  I like the color scheme and general look.  But I attempted an earth-sky effect on the bolt at the end of the plasma rifle, and it's pretty much a failure.


Here, I show one of the new guys alongside one of the dudes from the first unit of Fire Warriors that I painted, oh, I don't know, sometime around 2007?  I also show a primed and oil-washed figure from unit #3, where I used a metallic paint on the bolt, for comparison.  For the best effect, for time invested, the metallic is definitely the way to go.

The earth-sky fails for a few reasons, I think.  One is color-choice.  I needed to get more orange-yellow in the top and less brown and more orange on the bottom.  Another thing I needed to do was bow the horizon line, instead of painting it straight.  That just makes it look like it's painted in two halves.  I need to exaggerate the contour of the round bolt-head.  And finally, I think there just might be too much going on, in too small a space, what, with the slot and the horizon-line making two different bisections.  It's just too much for the eye to resolve, perhaps.  Lessons learned.

Saturday, October 31, 2015

Dreadtober - still WIP!

I did not quite make the deadline, but I thought I would show where I stand.


Real life got in the way, with work making unreasonable demands on my leisure time!

Since the last update, I added some metallics, some freehand, and some glow-ey eye-slits.  There is so much still left to do.....
  • more metallics and some colors on some of the mechanical elements on the back
  • a freehand flame pattern on the Meganob with the flamer (yellowish guy on the left)
  • some more freehand checkers (but more traditional white-and-black)
  • designs on the rockets
  • details on the guns and headsets
  • the hairspray weathering
  • sponge weathering
  • bases
  • washes
  • paint the ork faces and skin
  • dry pigment weathering

So, yeah, my big take-away from this project:  even though you "can't make a mistake painting Orks", they require a hell of a lot of work!

Saturday, October 24, 2015

Battle Report - Warhammer 40K

I played my first game Warhammer 40K 7th Edition today.  I played only about 2 games of 6th Edition.  I could say that 40K is not in my regular rotation, but I'm not sure I can claim anything is in my regular rotation.  I'm basically a gamer of opportunity -- I play what my group is playing or what the next convention may bring.

As it turns out, a surprise opportunity came along, which was discovering that one of my fellow apartment denizens is a 40K player.  So Chris, my Wrath of Kings opponent, and Justin, my apartment neighbor, set up a 3-player, learning game to reacquaint all of us with 40K.  We played 750 points, and we omitted Psychic Phase, vehicles, buildings, flyers, and Tactical Objectives.

Justin plays Imperial Guard.  I let Chris use the Ork army that I purchased a couple of years ago.  I played my old faithful (at dying!) Tau + Eldar.

We played the Relic mission, which requires the armies to rush to the center to acquire a valuable artifact and keep it in the army's possession in order to seize the victory.  We deployed at equidistant points away from each other.  There was space for only a 9" radius, so the horde armies had a hard time fitting in their deployment zones!


I brought out my homemade pump plant and tried out my Frontline Gaming mat for the first time.  I couldn't find my cool industrial piping, unfortunately.   So the pump plant had to just dump out its toxic waste in a big pool beside the plant.  That counted as Dangerous Terrain...

My rarely used Malifaux Terrain-Clix terrain looked fitting as a loading area.  We decide the Relic was a Tau homing beacon, being used to call in orbital strikes against the plant.  You can see by the nearby craters that the bombardments are getting pretty close!

The Imperial Guard want to protect the plant and destroy the beacon.  The Tau must protect the beacon.  And the Orks...well, they're there to fight!


At the end of Turn 1, everyone is being careful to address their respective enemies on both flanks.  The Tau are making a beeline for the plant in order to find some cover.  A good portion of the Tau force is in Reserve:  a Kroot carnivore squad, Eldar Shining Spear jet bikes, and Tau Gun Drones.


This won't end well for the Orks...
As it turned out, they survived OK against the Sisters of Battle.  Justin was rolling some crappy dice.
However, the Guardsmen finished the job and earned Justin a First Blood victory point.

Krazy Kroot perform their classic Outflank maneuver and spring their trap on the heavy machine gun nest.
Hello, boys!
Tau and Imperial Guard play a war of attrition, while the Orks take the scenic route.
"Yes, this would be a rather pleasant site for some condos..."


The Tau were feeling pretty comfortable, putting the Guardsmen in a nice cross-fire.
Unfortunately, the Guardsmen go first, and they mowed down half the Kroot squad, causing the other half to run off the board.  Damn, how many times do I have to learn that lesson?  Actually, I just realized, they were supposed to Fall Back towards the Tau Deployment Point, not the side of the table.  They should have stayed on the board!


The Sisters of Battle press their newfound advantage and take the fight to the center, in an attempt to dislodge the Tau from the Relic.


The Sisters succeed!  The Tau are decimated and regroup and consolidate for a last ditch defense. 
The Eldar cavalry arrive on the scene.  Have they arrived in time?


A new threat arrives on the scene.  The Tau were caught in a classic anvil-and-hammer pincer.  By two separate, uncoordinated armies!


At least the Shining Spear put some hurt on the Guard, before everything goes belly-up.
(Whatever happened to those Tau Gun Drones, by the way?  Totally forgot about them!)


This was the state-of-affairs, when we had to call the game.  We declared the Orks the victor.  Tau and Guard pretty much bludgeoned each other, while the Orks preserved almost their full strength.  It was only a matter of time....

Sunday, October 18, 2015

Battle Report - Wrath of Kings

For this game, I wanted to experiment with shifting the proportion of my forces more towards Defender Linemen, as opposed to my Union Worker pigmen.  And by assigning the Defender Linemen Controller as the Commander, I hoped his Training, 'Iron Will', would aid in a battle versus Hadross, who have a few Will Attacks.

When I saw Hadross' deployment, I decided to experiment with yet another idea that I've been rolling around in my head -- decoupling the Leaders from their same-type units.  When Leaders command same-type units, the units benefit from the Leader's Inspiration.  But does the Inspiration make enough of a difference for the game, ultimately, or is it really very situational?

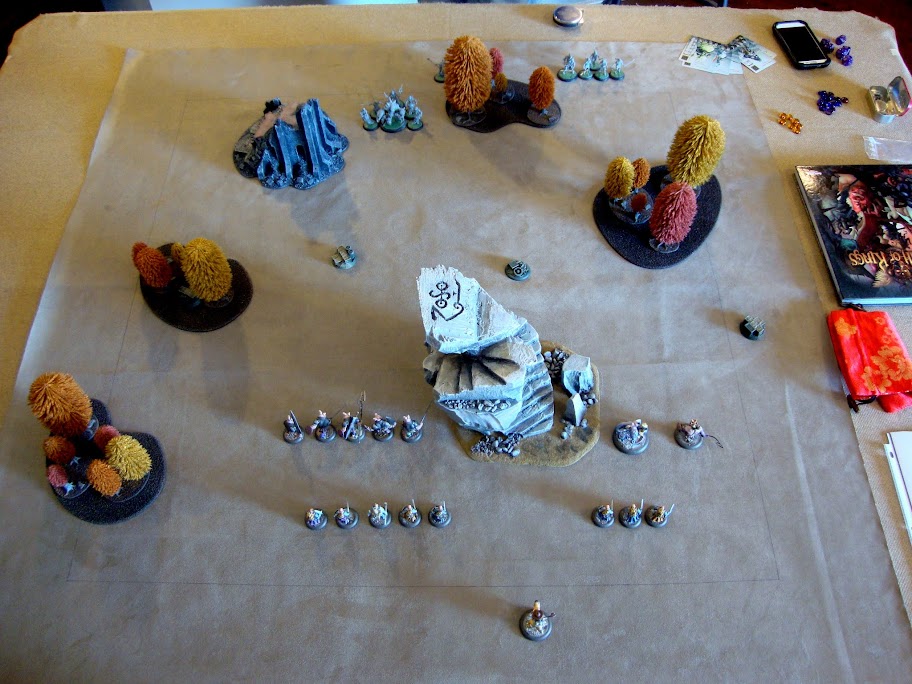
When I saw the Hadrossian deployment, I wanted a smaller force on the right, to skirmish and delay the Hadrossian left flank.  I wanted a greater concentration of my force in the center, where the bulk of the action would occur.  Commanding larger numbers in the center demanded placing the Linemen Controller there, since he was the Commander.  The Union Worker Boss therefore would command the small skirmish force of Linemen on the right flank.  Thus, the Leaders were decoupled from their same-type units, with the exception of the Commander with his rear rank of Linemen.

Teknes experiments with an unorthodox command structure.

The Hadrossian Motivation was Treasure Hunt.  The round markers that are spread across the center of 'No Man's Land' mark the Hadrossian objectives.  There's a fourth marker placed in the forest on the left side.  I'm allowed to place two of the markers, so I put one in the forest, which is Difficult terrain, and I placed the other one on the far extreme right, spreading out the objectives in the hope of complicating maneuver and position for the slow-moving Hadrossians.

Two of the four markers are the actual objectives, and neither player knows which ones they are, being randomized.  Naturally, Hadross want the actual objectives to be nearby and close together.  Teknes wants them to be farther away from Hadross and spread apart.

The Teknes Motivation is 'Capture Prisoner'.  Teknes must "kill" Hadrossian Leaders and/or Specialists and then escort them back to the Teknes deployment zone. 

The handmade terrain piece, 'Stairway to Heaven', makes a magnificent return to the gameboard!


Battle begins!  Hadross slingshots his Gutters forward by hitching a ride on the TaxiCrab.  A Gutter unveils the first objective on Turn 1 and discovers Treasure!

Teknes spreads out the forces in a bid to cover the possibility of the next Treasure being located either in the forest or in the center of the board.  Teknes hopes the Treasure will be in the forest, since Teknes will be able to outnumber Hadross there in short order, as well as split the Hadross army with the skirmish team.


The bacon is hot!

Hadross reveals the objective in the center and discovers their second Treasure!  Teknes is now on the back foot.  The Hadross plan is now very simple -- kill 9 Teknes models.

Teknes, on the other hand, have a hard task ahead of them.  They must beat through the Hadrossian line to reach the Leaders and Specialists.

The maneuver game finished, the enemy forces collide.

Teknes initiated the battle scrum by charging with the Union Worker pigmen.  This is where the experiment showed the importance of having the proper Leaders assigned to the same-type units.  While the Union Workers outnumbered the Gutters in their match-ups, the pigmen could have really used the option to be Whipped Into Frenzy by the Union Boss, and, given the crappy dice rolls, Teknes could have really used the Inspiration, Offensive Expertise, which would have permitted some re-rolls.  I doubt the results would have been any different, given the horrible dice rolls, but denying myself the option of Whip Into Frenzy and Offensive Expertise felt like a poor strategic decision.

Defender Linemen come to the Rescue of the pigmen, pulling them out of the combat so that the pigmen can be applied to more important objectives.

Linemen 'Rescue' the wounded Union Workers but unwittingly form a match-up that Teknes soon regrets, as the Linemen crumble against the overpowering Gutters, feeding even more victory points to Hadross.

Teknes makes a second push.

The way is clear for the Union Workers to collapse on the Gutter Friar Leader.
Unfortunately, the Teknes Commander almost dies from an encounter with the crab.  He must now be rescued.

The Gutter Friar goes down in a flurry of bacon-fueled blades.
However, the Teknes Commander is still exposed, and he falls to a crab charge.  Game over!

The battle collapsed for the Teknes general (me!) on several counts.  However, the game was very educational, and I'm glad I took the opportunity to try out the alternative force structure, just to see what would happen.  Nice to give it a try with a small game, so that it's easier to observe the impact of the alternative force structure and draw more convincing conclusions about it. 

Friday, October 16, 2015

Another Dreadtober update

Photo/Drawing/Logo by Todd @ Sincain40k
I tried my hand at masking with poster putty.  Here, I've already applied one color, and now I've applied the poster putty.  I ran out of putty for the one foot.  I could have scavenged from the putty I already placed, but I decided I would just do that foot free-hand.  No one is going to notice the difference on a game piece.


Second color.
Voila!
I was surprised by how sharp the lines turned out.  I thought that the rolled up sausage-like mask would produce a soft edge.  I think I should have used the putty technique on the smaller Kans and done the free-hand on the larger Dred.  I could still reverse it all, but I'm not going to worry about it.  There's still so much more to do.  These look cool enough.

Here's the whole family.  The center MegaNob went through about 5 color changes.  It started out a purplish-grey, which provided good contrast for the green head, but it was a tad too Easter Egg-y.  I desaturated it towards a salmon, then a biege, and then a desert yellow.  I'm not liking it still.  I think I'm going to bring him towards an orange-ier orange than the yellow-orange guy.


Thursday, October 15, 2015

Dreadtober update

Photo/Drawing/Logo by Todd @ Sincain40k

I've been working on MegaNobz, Killa Kanz, and a Deff Dread.  The work has been very sporadic, as I've been searching through the backlog to find all these models, and I've been caught up at work, too.  I wanted to have a decent story to tell, before I posted.  So here's a walkthrough to the first interesting pause-point.

Burnt Umber over black primer.

Sponged with 3 shades of orange.
Gloss varnish, matte varnish, hairspray.

And finally some color.

Saturday, October 3, 2015

Redstone Rumble!


The Redstone Rumble is rocking Huntsville, Alabama, this weekend.  I had the pleasure to meet the organizers and a few players.  The event is an impressive size, boasting well-attended tournaments for Warhammer 40K, Kings of War (to replace Warhammer Fantasy), Infinity, and Bolt Action.

I happened to arrive during lunch-hour, so I was lucky to capture a lot of photos while the armies were on display.  Here are some views of the general game areas, to give an idea of the size of the event.

The 40K tables.
Kings of War
Some very well-provisioned Infinity tables.
The Bolt Action area, with probably the fanciest tables among the events.
Is that enough bocage for you, John Stiening?


Some very nice elements for the 40K tables.

Redstone Rumble draws players from Atlanta, Birmingham, Tennessee,.... 

And it was fantastic to see the high standard of painting and hobby on display.

The fantasy armies for Kings of War:

A wonderful display board for a Skaven army.
A Hellpit Abomination, prodded to war by the scurrying ratmen.
Another inspired display board for an Ogre army.


40K armies...


And here is an army painted by local talent, Clay Williams, of Mastermind Models & Miniatures.


And here was another one of my favorites, another Skitaari army by a nice gentleman, Charles, from Atlanta.