Friday, October 14, 2016

WIP - Goblin archers

The following photos show my good intentions to build out my Goblin army for the local Redstone Rumble gaming convention this weekend.  Spoiler:  I didn't finish even one unit! 

Not even the chariot (although I still have a chance to finish that tonight -- we'll see...).

After many sessions of cleaning, prep, assembly, deflashing, etc., the horde is set up on the assembly line for painting.

It's been a while since I've done assembly-line painting.  As a matter of fact, I don't think I've attempted this many models before.  I've probably come close with a unit of Saurus Temple Guard or a unit of Dark Elf Spearmen quite a few years ago.  But for those units, I had the benefit of using only one color scheme.  When I paint goblins, I make it harder on myself.  I ponder individual color schemes for each individual model.  That approach is not conducive to batch-painting!

Halfway through zenithal priming.

So, I have to say, after working with Mantic Games' goblins, I am unimpressed with those models, to put it mildly.  It's like they're about 15% melted.  I almost abandoned them, and I even considered just throwing them out.  But I have two motivators to press through with them. 

One, the studio paint-jobs do show them in a relatively good light, where the figures convey a sense of character and personality.  After all, those photos are probably what convinced me to buy the models in the first place.  If I can manage to bring out that personality, I might be happy with them.

The second reason to persevere with them is that I spent some real money on them!  Yup, these guys go all the way back to Mantic's first Kickstarter, if I'm not mistaken.  So it's taken 6 or 7 years to finally bring these boys out to the painting table.  But I bought a lot of these stinking goblins, so I need to give them a fair shake, before I decide to kick them to the curb.

I assembled 8 of the Mantic goblins to mix into the 4 archer units.  I'm going to see how they look in the mix, before I decide their ultimate fate.  This plan forces me to prepare 8 back-up models from other ranges, in case I decide against the Mantic goblins.  Which creates even more work to get through this project!


I laid down base colors for a variety of skin tones.

One of my favorite steps -- washes. 
The wash step would be very fast, if I didn't spend so much time experimenting with the washes! 

I find I'm still trying to master how to craft and apply optimum washes.  For example, I compare my home-made washes to store-bought washes.  I experiment to see what type of pigment works best:  opaque paint, transparent paint, or ink.  I experiment with different mixes of water, medium, and flow enhancer.  As always, I end up with mixed and inconclusive results!


The by-product of exploring different wash solutions.

It took quite a few sessions to get through the first strip of goblins.  I spent a lot of time comparing techniques, bouncing back-and-forth between full-on opaque techniques, like wet-blending, and more batch-oriented transparent techniques, like washes and glazes.

On the back-up models, I even tried out the Kevin Dallimore approach of 3-step colors.  I am not a fan of that technique, I decided.  I'm glad I finally got around to trying it, but it is not for me.  It takes more than 3 steps to bring the contrast to where I need it, and I find it more laborious than applying my preferred techniques.  As a matter of fact, it was such a grind, I began to understand why some people hate to paint models for their armies!

The first strip of goblins are done. 
8 strips  to go!

Hopefully, all of this experimentation will lead me to some default, "go to" methods, which I can rely on to crank through certain decisions and thus pick up my pace.

A classic Kev Adams sculpt, a wee Red Box goblin by Tre Manor, and a cool "signaler" for the unit.
I just love the character in all of these little guys.

Tuesday, October 4, 2016

Prep for Redstone Rumble

My next hobby milestone is to prepare for the Redstone Rumble, a local miniatures gaming convention coming up on 15-16 October.  Among my gaming group here, the favored game-of-choice at the convention will be Kings of War.  I have scant interest in playing in a 2-day tournament of any type, but I want to support the convention and help energize the local scene.  So I offered to play “the ringer” in the Kings of War tournament.  Hopefully, it will turn out that I play 2 or 3 games, and that will work out well for everyone.

I am also using the event to motivate me to expand my Orc and Goblin army, a years-long project that seems continually stalled or reprioritized.  Kings of War forces you to pick predominantly Orcs or Goblins.  There are separate armies for each, and then you can optionally ally up to 25% of your force from the other type.  I’m going to focus on Goblins, since I have a better head-start on Goblin forces.  Even so, I still need to double the meager 1000-point list that I was able to muster for my practice game two weeks ago!

So the first step has been to collect all the different Goblin models that are stuffed away throughout the apartment in numerous cubby-holes, closets, and crates.  Kind of a fun project in and of itself!  Especially when I came across some of the old-skool kits that I had stuffed away…


I have to admit, the 'nostalgia effect' made me pleasantly happy to "play" with my old-skool toys of yesteryear. 


The Grenadier collection was quite cheering, especially with this insert featuring Dave Arneson, co-creator of D&D.


By definition, this box of figures became an antique in 2008!
As it turns out, though, I won't be using these figures in the first round of projects.


For my practice game a couple of weeks ago, I wanted to at least add a new unit to my sparse army.  I picked up an old-skool Warhammer Goblin Wolf Chariot at NOVA Open (not remembering that I already had a duplicate kit at home, of course), and I was itching to work on it.  I was delighted to learn that the Kings of War Goblin army list has an entry for a Goblin King on Chariot.  Perfect! 

I named my Goblin King, "Maverick, Chieftain of the Clan of the Ill Wind.


I had to make my own base for this kit.  Despite the box-cover photo, the kit only provided cavalry bases for the wolves.
This photo belies the work it took to get to this point.  There were originally 23 pieces, now reduced to a half-dozen.


I like the color scheme on the box cover.  I decided to duplicate it as best as I could.


This is as far as I got, in time for the practice game.  I'll finish up the goblins and the basing before the Rumble.


In the practice game, Wood Elves obliterated my Orc units under heavy bow-fire, while a Treeman neutralized my own archers.  I didn’t use my new-fangled chariot soon enough as a flanker, and my force pretty much dissolved.  Ringers are expected to lose their games for the greater good, so I proved that I’m going to make an excellent ringer!

The next step was to bulk out my goblin forces and expand my army.  I need larger-size units in order to qualify for all my cool cavalry units.  So I decided to focus first on mass blocks of archers and spearmen.

Clipping, organizing, trimming/deflashing.  Ugh.  This is my least favorite part.


More planning and organizing.  Planning and organizing for the future as well.


Some figures required assembly.  I did some simple part-swaps, too, to add that much more variety.
All told, for this type of mass unit, I'd rather just have single-cast or two-part minis.  It's not worth the assembly time for the multi-part minis.


These Harlequin and Red Box minis are so tiny, I need to make their own bases so that they can stand upright, while I paint them, and have enough of a contact point to affix them to the stand.


Tiny goblin is tiny.


Finally, I get to see how the unit is going to look eventually.


I plan to include a "signaler" in each unit.


Here, I spend a Saturday morning crafting custom trays/stands.  I spent evening or two prior, cutting the boards into game-appropriate dimensions.  A good chunk of afternoon time was spent priming, painting, and sealing.


Saturday, September 24, 2016

Mini Mayhem - The Game!

After about a 3-year hiatus (and about a 3-year hiatus before that...), at long last, I finally organized a game of my own homebrew rules that I composed from 2006 to 2009.  Among my friends with whom I meet weekly online on my hosted Hobby Hangout (via Google Hangouts), I've built up the expectations for Mini Mayhem to be the premier mass combat, fantasy/historical wargame, both in terms of gameplay and game design.  Of course, I may be a little biased....


Armored knights clash in epic battle in a game of Miniiiii Mayheeeem!!!

My friend, Chris, helped me give the game a run.  With only one game in the last 5 to 6 years, I was a little rusty on some of the rule nuances...  While we expedited a temporary solution for a few of the murky details, a couple of gross oversights probably cost me the game.  But I get ahead of myself...

Arrayed for battle!
My Orc & Goblin army on the left versus Chris's Chaos Legions army on the right.
A literal 'King of the Hill' battle.  Each army must win the hill-fort overlooking the river.  At all costs!

A horde of Goblin Squabs in the foreground, followed by two formed blocks of Orc Spearmen, Goblin Knight Rat Riders, Goblin Archers, Goblin Squig Riders, and, finally, pulling the vanguard on the left, Goblin Wolf Riders.

Tons of Chaos Warriors.  Holy crap.  Who designed this point system?!


The armies make their initial bids for position.  The Rat Riders make a beeline for the opposing armored knights. 
By the way, whoever heard of goblins being able to afford plate armor?  Well, I ruled that these guys had to be mercenaries, and so they actually cost extra army points.  They better be worth it!

Mini Mayhem uses an activation system that combines command & control tests with a reaction system.  If a unit can overcome the fog & friction of war, a unit can respond to any action that the enemy takes.  The system is efficient, because it allows a player to lump together routine actions until the opponent decides to react to something remarkable.  Activations can fully alternate, too, if command & control is sufficiently maintained.

The Wolf Riders shoot the gap! 
They use their swift speed to bypass the ponderous, ranked formations in a bid to harass the rear.
I don't know any other mass combat game that allows this kind of flexibility.  Unfortunately, I did break a 'minimum separation' rule to pull this off.  In theory, this maneuver can be done, but it might require a wider gap.
"See ya, suckas!"
The armies eyeball each other across the objective. 
The Orcs are grossly outnumbered.  They hope to gain the hill first in order to win a charge advantage, charging down the opposite side.


The inevitable fight for the flank begins.
Surprisingly, the Squig Riders hang tough.  The Chaos Hounds have a hard time piercing their rubbery hide, while the balloonish, hopping "teeth with legs" ravenously tear through the half-dilapidated road-kill.

Oh, no!  I totally forgot that the Chaos Marauders are a loose formation.  They react and reposition to plug the gap, just like a Roman maniple!  Did I mention that Mini Mayhem works just as well for historical battles?

The Wolf Riders quickly rip apart the Marauders. 
The Marauders didn't count on both the Goblins and the Wolves making attacks.

The deciding battle is joined!
A classic clash of lances on plate armor.

The Rat Riders are Routed!  Lousy mercenaries!
The Chaos Knights surge ahead to a shocked Orc unit, who are caught flat-footed and utterly destroyed!
So the mistake I made here was that the Rat Riders were supposed to have only been Shaken, not Routed.  This oversight probably decided the game, since the Rat Riders would have at least pinned the Chaos Knights for a counter-charge, if not actually destroy them in turn.

Even with the advantage of the downhill charge, the Orcs succumb to superior numbers, and the Chaos Warriors take the hill.
With all the key Orc units defeated, the battle is done.  Next time, Chaos Warriors!

Tuesday, September 13, 2016

Project walkthrough - Valhalla


This post is the first in a series of posts that will backfill the blog entries that I would have written over the course of the summer.  These are the projects that I wanted to keep hidden until I could reveal them at the Capital Palette competition at the NOVA Open convention.  My intention was to prevent contaminating the judges' opinions, either yay or nay.  At the Capital Palette, the entries are anonymous, so I wanted to avoid having the judges associate the entries with me, just in case they read the blog!


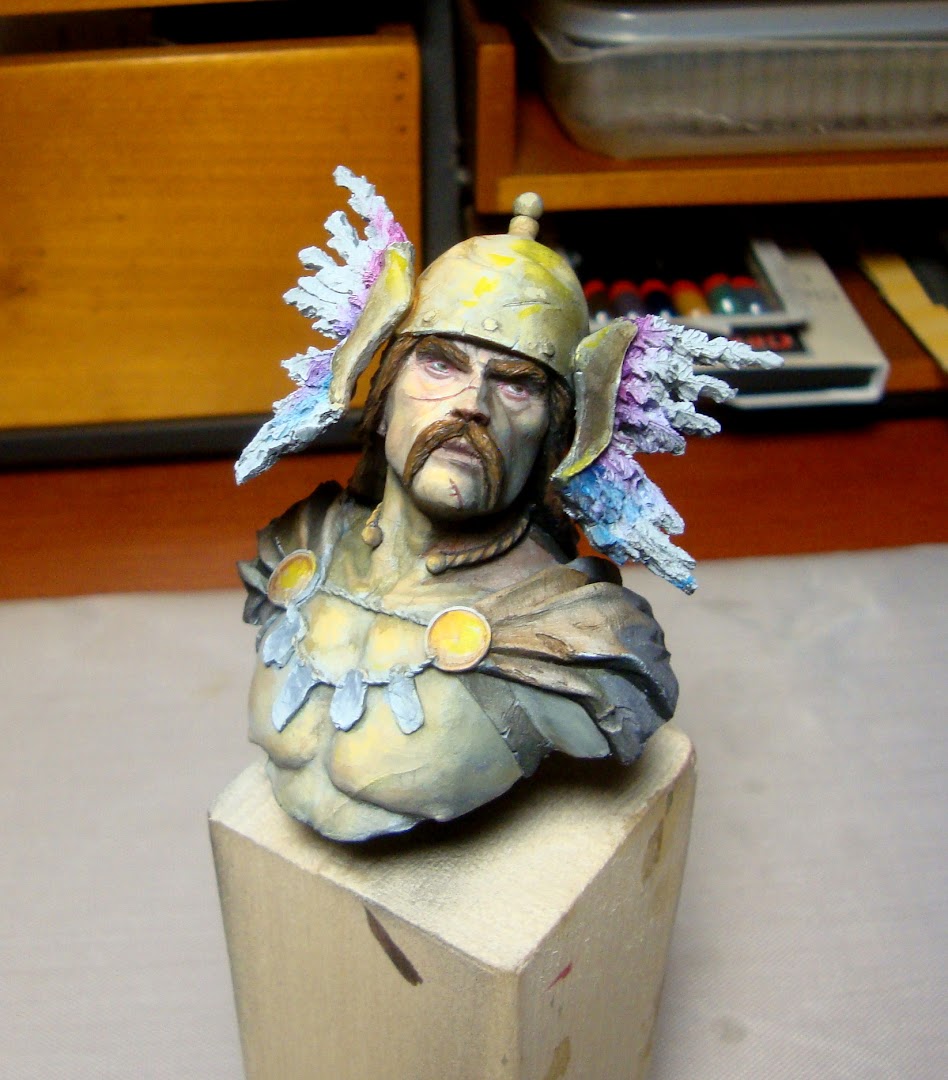
So this gentleman is the "The Great Gaul", by Yedharo Models.  For display figures, I feel more motivated to paint a figure the less known a figure is.  Some figures have a lot more exposure than others in the hobby press and at the shows.  I want to show something different and more obscure.  Of course, if I wait 3 years or so to start a project, like I did for all of my projects this year for the Capital Palette, I risk having my choices be painted and shown by other artists, long before I can present my own interpretation!

Another thing I wanted to achieve with this project was to distort what is presumably a historical piece and warp it into a fantasy piece.  Technically, this bust is my first historical project.  But I couldn't resist giving it a twist and slapping it with the fantasy palette.

I imagined the character looking up into the sky, beholding golden sunlight.  An omen before battle?  The sorrowful aftermath?  Valhalla?  I'll let you decide.

I had a difficult time deciding whether to paint the metals with the true metallic metal (TMM) technique or the non-metallic metal (NMM) technique.  For larger figures, especially busts, it's much safer and much more common to use TMM, using metallic paints.  I was torn, however, because I was curious if I could pull off NMM.  I decided I would try it on for size, for the challenge of it, and then just paint over it with TMM, if I wasn't pleased with it.

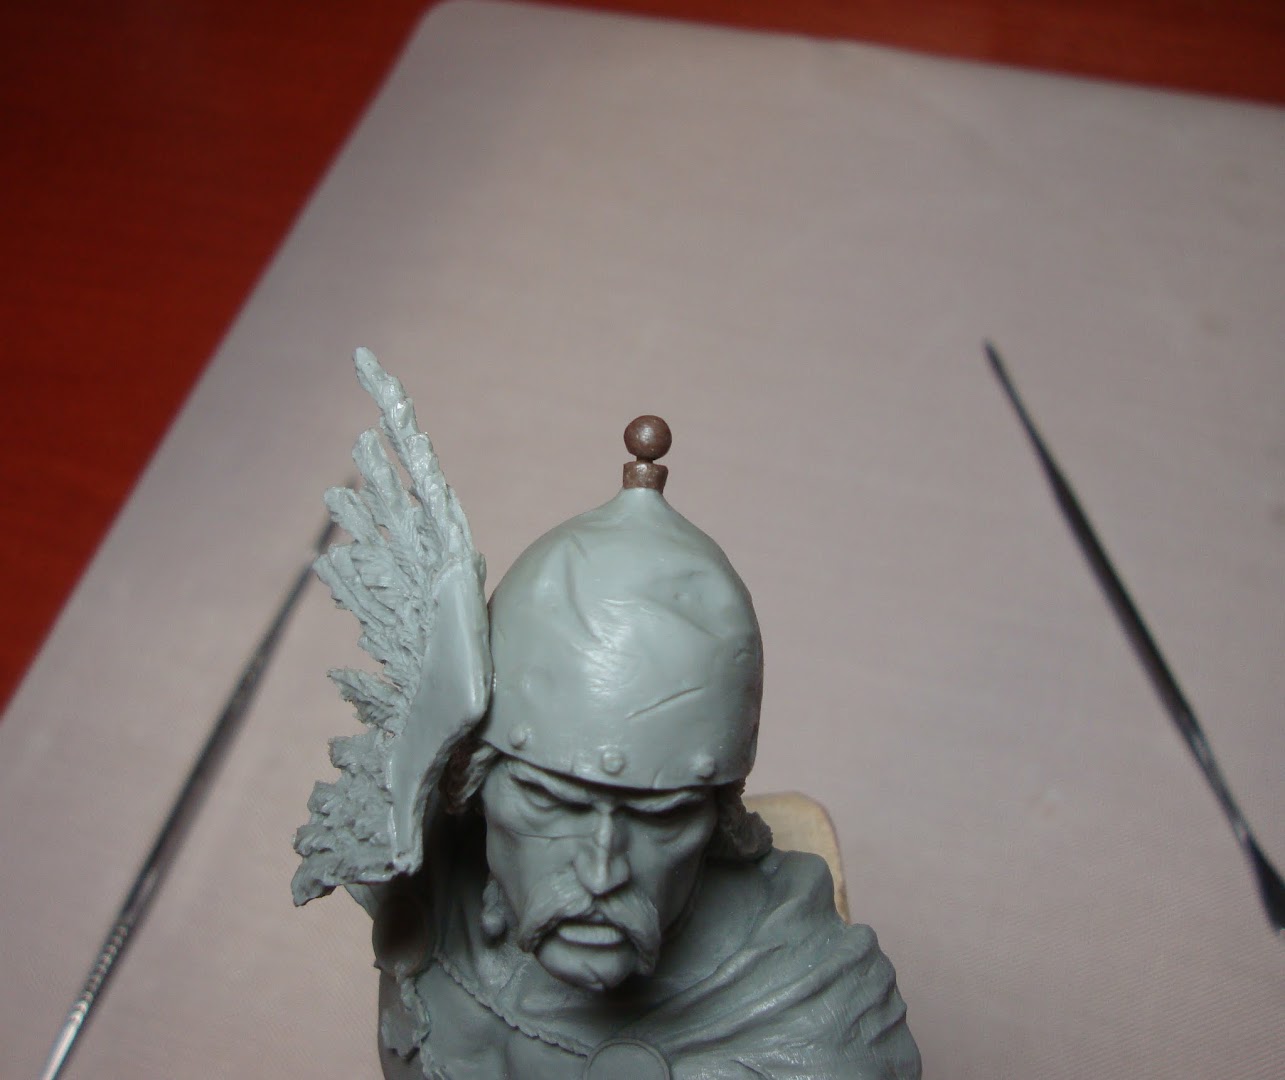
The bust was packaged with the top-piece of the helmet broken off and missing.


So I had to build one from scratch.  I started with a pin.
I tried out "brown stuff".  It's supposed to lend itself better towards sharper edges.
Not perfect -- but convincing.
Starting with some off-angle, zenithal priming and thin color-sketching.
I'm eager to test the key concept.
I start color-sketching the skin, general contrast, and the cloak.
Continue to exaggerate the contrast.  I start to think about the overall color composition.
It's hard to imagine the total effect, when the uncolored hair makes the guy look so middle-aged.  I had a younger guy in mind.  I color the hair, and I do my first pass on the eyes.  There's progress, but I'm unsure of my direction from here.
I try a warm color for the cloak.  I hate it.
This feels a lot better.
I work the helmet.  And work it.
The eyes are slightly off.  And I want the irises to be more apparent, and I want to add catchlights.
The skin was too yellow, so I enrich it with more reds, blues, and greens.
I attempt a second pass at the eyes.  I succeed in painting the catchlights where I want them, but they still look wrong.  I paint over them again.  "I'll try again later," I say.
Along the way I tried a tartan pattern on the cloak, but the colors weren't working.  "I'll come back to it," I say...

This is where I left off, before my job hit me with a surprise proposal.  I still had to do the feathers, the clasps, the torq,  the necklace, the leather, the tartan, the eye details, and some refinements. 
I finished most of the loose ends in one day, three days before leaving for NOVA!
I wasn't able to refine the eyes or paint the tartan.  Might have made the difference between Silver and Gold, but I'm very satisfied with the result.